Saturday, September 16, 2017

A STURDY TABLE FOR MY ROUTER TABLE

A STURDY TABLE FOR MY ROUTER TABLE

When I got my new router it was difficult for me to hold it in place when I was working with it.  My neighbor is a carpenter and built this table for me.  It is so nice to work with my router, now.
  He made it just my height.
It stays in place when I'm pushing on the boards that I'm cutting.  See that little silver latch on the front?  That is to open and lean the table back so I can replace the router bit. 
That shelf is to hold my shop vac to catch all of the saw dust and it really does catch it all.  Standing so close and leaning over the table, I didn't have to breathe in any of the dust.  He even custom made a little pvc attachment so my vacuum hose would fit the router table outlet.  See those two rollers on the bottom?
See the posts on this side?  He thought of everything.
On this side I lift the table, hold onto the metal legs and pull.  The rollers on the other side let it roll so I can move it wherever I need to.  Being a carpenter he thought of everything that might be a problem for me using my router.  So easy!  And, so nice!

VISE-GRIPS...MY NEWEST FAVORITE TOOL

VISE-GRIPS...MY NEWEST FAVORITE TOOL

I was mowing my yard and the muffler on my lawn mower started smoking.  It was really rusty.  I tried to remove the muffler so I could take it to Lowe's by my house and get the exact same one.  I tried and tried to take that rusty muffler off and it wouldn't budge.
At Lowe's I found the replacement muffler and asked the guys how I could remove the old rusty one.  They said I needed vise-grips.  Some of them had a smaller width opening and this one is really large so it could fit my muffler.  It can also be adjusted to fit something smaller.  They were under 20.00.  I came home and used those vise-grips and could not believe how easy it was.  You punch that round silver button to adjust the size and then just turn whatever you're trying to loosen.  I think this will be one of my favorite tools.  Maybe you already knew about vise-grips.  I wanted to share this great find with you, just in case.

HAND PAINTED BLACK & WHITE CHECKERED WOODEN KNOBS

HAND PAINTED BLACK & WHITE CHECKERED WOODEN KNOBS

A blog follower was painting her kitchen and needed new knobs.  She contacted me and asked if I could paint black and white checkered knobs for her kitchen.  She was painting her kitchen cabinets black and these knobs would look great on black.  I painted samples for her and posted a tutorial on my blog so she could see how I painted the samples in black and white checks.  
(LINK TO TUTORIAL)

PAINTING A NEW FINISH ON AN ELEGANT WINDOW CORNICE

PAINTING A NEW FINISH ON AN ELEGANT WINDOW CORNICE

Too much metallic gold and too much green patina on these cornices.
I was asked to tone down/age/antique them to match the room decor.
(LINK TO TUTORIAL)

Friday, September 15, 2017

PAINTING A BEAUTIFUL CHANDELIER CEILING MEDALLION TO MATCH WALL COLOR

My clients were building a home.  They purchased this beautiful large ceiling medallion for the dining room chandelier and said maybe I could paint it to match the cabinets nearby.  I said, "I'll be glad to do that but let me show you how it will look if I paint it with the wall color.  If you don't like it I will paint it to match the cabinets."
They LOVED it!
It was already white.  I used the wall color.  I painted on and used a rag to wipe off some areas.  Then, I painted the swirly scrollie areas more solid to contrast and set off the lighter wiped areas.  Because the paint was an eggshell sheen, it did not need to be sealed.
My clients were very happy with the way it turned out.
This house is out in the country and the gray and green colors they used looked so nice with the beautiful nature scenes you could see from their very large windows.
~
PAINTING & INSTALLING A CEILING MEDALLION 
~
TUTORIAL
     This ceiling medallion was white. 
 I painted the dark brown, then the gold and silver.  
     If you want to paint a ceiling medallion you don't have to do all the detail.  Paint a base coat and  sponge metallic paints or any colors you want all over.  You can leave it white or you can paint it a solid color like your ceiling or wall color. 
 Then, seal it with a dull or satin clear coat.  
     It's most convenient to install a ceiling medallion when you are changing out your light fixture or fan.  If you have an electrician he will have to take your fixture down, attach the ceiling medallion to the ceiling and reattach the fixture.
     If you want to do it the easy way...there are medallions that are a little smaller and are in two pieces.  Once you paint the two pieces you attach them to the ceiling around the base of your light fixture or fan.  Sometimes, to get it to fit properly, you have to unscrew the fixture canopy at the ceiling.  That is the part of the fixture on the ceiling that hides the wiring.  All you have to do is loosen the canopy with a screw driver, lower it, attach the ceiling medallion and then re-screw the canopy at the ceiling.  One thing that might be important is to measure how wide your canopy is.  Some are three inches and some are four inches, etc.  You need to make sure it will fit in that middle part of your ceiling medallion.
~
Base coat tan, painted metallic gold & aged with black paint.
Tan base, painted metallic silver, gold & copper.
Painted moss green base, metallic silver, gold & burgundy.
The green base looks like a patina.
Painted tan base, metallic copper trimmed with metallic gold.
Aged with brown paint.
Green base coat, metallic gold, silver & burgundy.
Painted moss green base coat.  Used two shades of metallic gold.
Then lightly rubbed metallic gold all over.
Dark brown base coat.  Metallic gold & silver.
Aged with same dark brown.
Turquoise, pink, purple, yellow & green.
Metallic gold & silver.  Antiquing glaze to age.
Dark brown base, crackle medium  Painted purple grapes
green leaves & dark brown vines.
Tan base coat.  Metallic gold & metallic burgundy.

Tuesday, September 5, 2017

DRAWING & PAINTING TROMPE L'OEIL WINDOW & SKY ARTWORK ABOVE PATIO DOORS

DRAW & PAINT WINDOWS ~ SKIES ~ SHUTTERS

Years ago, before I finally started using a digital camera I took lots of pictures of my work and had the "film developed".  I bet there are some people who don't know what that means.  Looking through those pictures I'm finding work I want to share with you.
In her living room, my client had very high walls and a big empty space above her doors that went out to her patio.  She asked me to come by and suggest something to go on that wall.  She asked what I thought about some design with scrolling.  But, seeing the outside I immediately saw a window with a sky and trees. 
 I suggested that to her and she loved the idea.
It was very easy to draw and paint.  I think you could do it, too.
~
TUTORIAL
First I drew the frame that would frame the sky.  I made it 4" or 5" wide.  You can decide how wide you want your frame to be and paint it any color you want.  I painted it the same white as her doors and woodwork/trim.  Use craft paints raw umber or some darker browny gray for shadowing around the edges.  In your color tray water down the paint just a little bit so it will flow more easily as you paint.  Painting that thin shadow will make it look more 3 dimensional.  For shadow reference, look around the room at the shadows on other trim.  Next, with my brush I smudged and swiped blue and white (like faux painting) and made it look like a sky with clouds.  Draw you some birds.  You can make copies or draw them on paper and trace the birds on the wall, then paint them.  Decoupage would be ok, too, for the birds.  For the trees I like to draw the branches first with a pencil.  I draw lines where I want them to be.  Paint over them with raw umber or whatever shade of brown or gray brown that you want.  Then, draw leaves or use a small paint brush and dot, dot, dot with green.  You can also draw any size or shape of leaves you want.  At first you might not be happy with your artwork, but wait a while and let your family and friends see it.  After a while I bet you will be very happy with yourself.  
Have fun!!
~

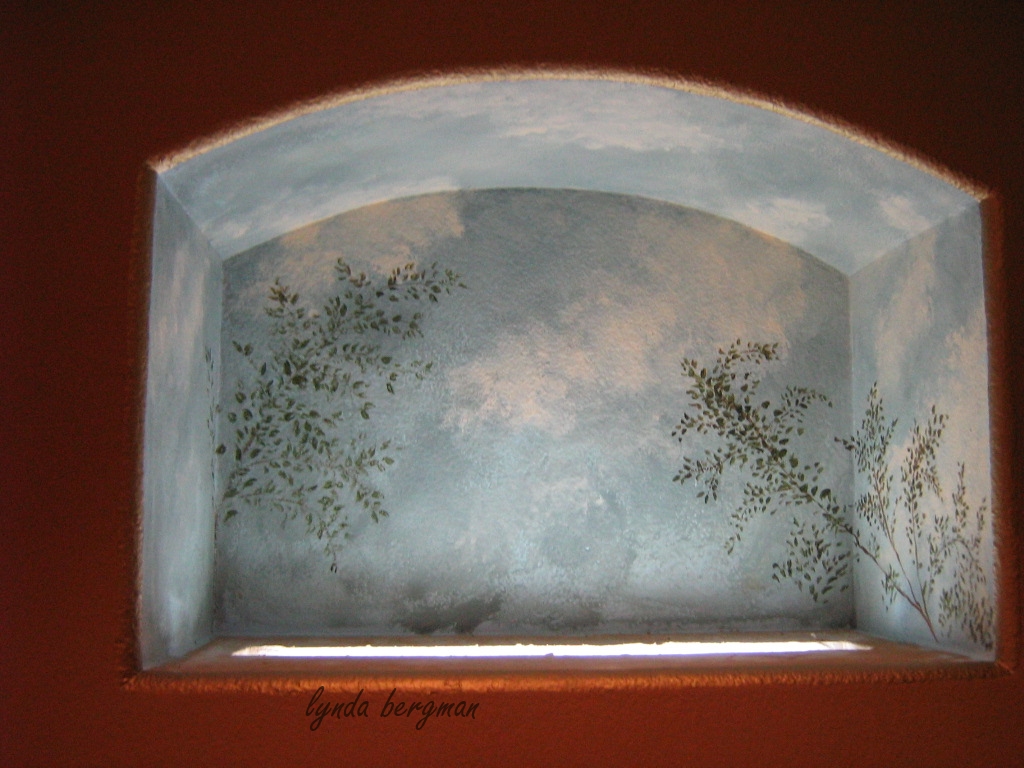
PAINTING SKY & CLOUDS ARTWORK IN A NICHE ABOVE THE LINEN CABINET

While I was doing other work at Carolina's home she asked me to look at her guest bath.  She wanted me to paint the cabinets black and metallic gold.  There was an open space above her linen cabinet and she asked if I could paint a sky inside of it.  
She added a bird nest.  
That completed the scene and looked just beautiful to me.
There is a light at the bottom, shining up at the sky.
Here you can see it from the guest bedroom.
Before she added the bird nest.
~
TUTORIAL
In a small space like this you can paint the blue first and add swirly white or you can paint the white first and paint some swirly blue.  Then, work on the area to get your clouds and sky just the way you want them.  I used brushes, but you can use a rag or a sponge.  If you want to add some branches, use a small brush.  Use the paint colors of green for leaves and brown for branches.  Draw your branches then draw tiny leaves or the size you want them to be for your sky.
I used craft paints.
HERE IS A LINK TO 
~

SHUTTERS

PAINTING METALLIC GOLD/LEOPARD SPOTS SHUTTERS FOR A WINDOW
(LINK TO)
& TUTORIAL
~