Showing posts with label tutorial. Show all posts

Tuesday, September 19, 2017

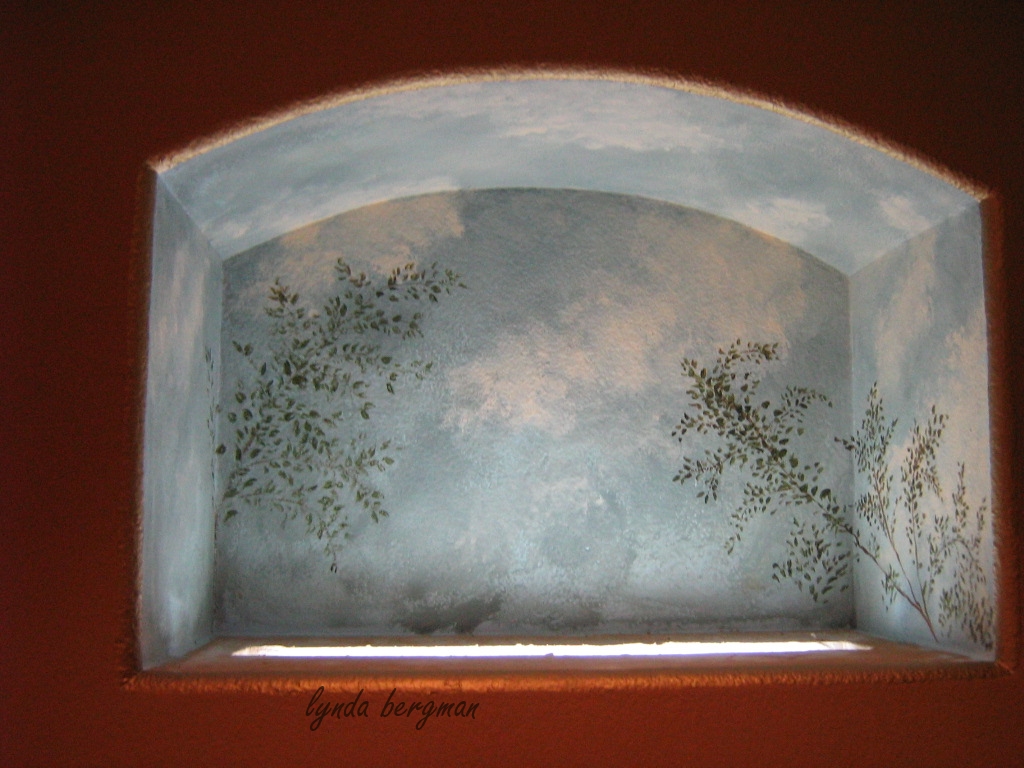
PAINTING SKY & CLOUDS ARTWORK IN A NICHE ABOVE THE LINEN CABINET

PAINTING SKY & CLOUDS ARTWORK IN A NICHE ABOVE THE LINEN CABINET

While I was doing other work at Carolina's home she asked me to look at her guest bath.  She wanted me to paint the cabinets black and metallic gold.  There was an open space above her linen cabinet and she asked if I could paint a sky inside of it.  
She added a bird nest.  
That completed the scene and looked just beautiful to me.
There is a light at the bottom, shining up at the sky.
Here you can see it from the guest bedroom.
Before she added the bird nest.
~
TUTORIAL
In a small space like this you can paint the blue first and add swirly white or you can paint the white first and paint some swirly blue.  Then, work on the area to get your clouds and sky just the way you want them.  I used brushes, but you can use a rag or a sponge.  If you want to add some branches, use a small brush.  Use the paint colors of green for leaves and brown for branches.  Draw your branches then draw tiny leaves or the size you want them to be for your sky.
I used craft paints.

Monday, September 18, 2017

FROM BATH CABINET TO A HAND PAINTED ARTSY BIRD CABINET & TUTORIAL

FROM BATH CABINET TO A HAND PAINTED ARTSY BIRD CABINET & TUTORIAL

In a home where I was working, my clients happened to be remodeling one of their bathrooms.  They were replacing their cabinets and put them in the garage to be hauled off.  One of the cabinets was a linen cabinet that hung over the commode and when I saw it in the garage I just knew I could do something special with it.
I bet lots of you have this same cabinet over your commode with the opening on the bottom for tissues, towels, etc.  I asked a carpenter to help me with the feet.  I asked him to turn it upside down with the opening at the top.  I found these feet at Lowes.  Actually, they are fence post finials.  I asked him to attach these feet to the cabinet.  The little wrought iron corner pieces I found at Hobby Lobby.
LOVE their 40% off coupons!!
Added the new handles and painted right over them.
 I primed and painted it a soft blue. 
 Painted all of the artwork on front and sides.  
Aged it with an antiquing glaze and sealed it with a clear coat.
The inside I painted an off white that matched the other artwork.  
I painted little metallic dots on the front of the shelves.
Painted metallic copper/bronze around the feet and a couple of other places on the cabinet.
I really love how this cabinet turned out and it sold very quickly!  
One of these days I think I will get to see it again in a client's home.
I do hope so!!
 Because I forgot to take a "before" photo of the original linen cabinet, 
I found this on Google to show you. 
 I wanted you to see what I started with.
See!  I turned open space to the top for my cabinet.
You can do it, too!

Thursday, August 24, 2017

HOW TO BUILD A SHUTTER CABINET FOR A SMALL SPACE

HOW TO BUILD A SHUTTER CABINET FOR A SMALL SPACE

When I found this shutter it was painted white and a little bit of wood was showing through.  I wanted it to look more distressed, so I left it outside for three or four months.  After being rained on several times, I decided I finally liked it, just fine!  So, I distressed it a little bit more and added white and gray paint.  Then, I added the subtle stencil on top, middle and bottom in a soft metallic silver.  
Actually, I was just curious how it would hold up after being rained on.  
Maybe you shouldn't do that :)
It's easy enough to get a distressed look with paint.
From the rain hitting it, there is a bit of decayed wood on the very top,
 but I really like the way it looks with the distressing.
As I was sealing the shutter, I put lots and lots of sealer on the decayed wood.  I didn't want it to crumble.  The rest of the shutter is not rotted.  Just the top.
My home is small and I'm always trying to figure out ways to add more storage.  This shutter cabinet is perfect just outside of my bathroom.  Those two legs that I added to the bottom hold it up, but I also added two L hooks/angle hooks on the top.  Otherwise, it would topple over.
After working on the shutter, I built a frame the size of the shutter out of 1 x 6 boards and cut and installed 7 shelves. 8 including the bottom of the frame.  I used the wall as the back.  That way, it kept the cabinet narrow, since I didn't have a lot of room in the hallway.  At Lowes, I found some perfect legs to attach to the bottom.  I painted the frame and legs a steel blue and then painted and rubbed off metallic silver.  The color looks so nice with the distressed and faded white and gray shutter.  It needed a knob, so I found a wooden one and painted it to match the shutter.  At the very end, I sealed everything with a "dull" clear coat.

     Finally, I added the hinges and attached the door .
This cabinet is sooo easy to make and is the perfect size for a narrow space.

I really love how it turned out.  And, I did it myself!!

Thursday, August 17, 2017

DRAWING & PAINTING FAUX BRICKS (TROMPE L'OEIL) & TUTORIAL

DRAWING & PAINTING FAUX BRICKS (TROMPE L'OEIL) & TUTORIAL

The builder of this home had one area in the  kitchen that was very plain and needed "something".  Finally he had the idea of painting faux bricks to match the other two real brick walls.  He called me and asked me to paint faux bricks in one area in this kitchen.
So, I did paint faux/trompe l'oeil bricks for him.
Here are three walls with bricks.
Can you tell which two walls are real bricks and which one I painted.
Can you tell which one?
Alright, I'm sure you guessed it.  The butler's pantry was very plain and the builder wanted me to paint the faux bricks to blend with the other two walls.  When you're standing in certain areas of the big living room, you can see all three brick walls at the same time.  So, it was important to make them look the same.
Faux Bricks that I painted.
~
TUTORIAL

First, I used dry spackling and with a broad knife and my finger I lightly textured the area.  Then, I picked out colors to match the existing brick and mortar colors.  I painted over the whole area the grayish grout color. When that dried, I used my brick stencil to get the structure going.  Next, I used a regular brush to stencil the orange brick base coat.  Then, a brush to paint and a rag to rub out an off white, raw umber and black.  It took a while to work on each brick and make them different from each other.  Last, I went back with a brush and painted wider grout lines and wiped it with a rag and smudged out areas on each brick to match the existing real brick walls.
At the very bottom and at the very top I had to make my own bricks because the stencil wouldn't fit in those spots.  But, the bricks are so uneven it's very simple to do.  And, in the corners I lightly brushed some raw umber just so it shadowed a little bit.  Making it look a little more three dimensional.
I think anyone could do this.  
You could paint the wall behind your fireplace, under your kitchen cabinets. a mud room or any place you wish you had bricks.  And, you can use any color.
Have fun!!

Monday, August 14, 2017

DESIGN & BUILD YOUR OWN FIREPLACE MANTEL ~ EMBELLISH YOUR EXISTING MANTEL

DESIGN & BUILD YOUR OWN FIREPLACE MANTEL ~ EMBELLISH YOUR EXISTING MANTEL

Recently, I came across this picture of mantel assembly pieces.
I'm sharing it with you to show how easy it would be to build your own mantel.  Or, add colums and decorative pieces to your existing mantel. 
If you think you can't do it, a carpenter will know what to do.
You design and pick out the pieces and ask the carpenter to help you. 

Image result for mantels
Sometimes I will see a carpenter working on an existing mantel.  At first it doesn't look so good with all of the unfinished pieces being added.  But, once everything gets painted or stained the same color it looks great.  You can Google fireplace mantels to get ideas for your own creation.   I saw several that were $3,000 , $4,000. and even more expensive to purchase.  Pinterest is another place to find good ideas.  You can find trim pieces at home improvement stores and online.   Try to picture them after everything has been painted.
This is a mantel I painted. 
 It doesn't have a lot of trim pieces, but beautiful.
Another one I painted.  I love all of the round and curved trim pieces.
They're mostly individual pieces nailed, glued or screwed together.
Another huge mantel that I painted.
 It was so tall I had to reach up to work on it.
These mantels were all assembled with lots of parts and pieces.
 Look at the first picture above with assembly pieces.
You can do it, too!
~
I did not paint this mantel.
I was working in a home, loved his fireplace and asked if I could take pictures.  It would be very easy to build.
Love the simplicity!